Secure Home Assistant Access with Cloudflare and Ubiquiti Dream Machine
I've become increasingly reliant on Home Assistant to automate various tasks around the house. But how do you safely expose your instance to the internet for remote access?
You want to be able to log in from a remote location, but how to keep others out? This post will show how I'm using Cloudflare and the Ubiquiti Dream Machine to properly secure my setup on multiple levels.
To follow along with this post, I assume that you have:
- a Home Assistant installation
- a domain name that's linked to Cloudflare
- a Ubiquiti firewall product like the Dream Machine or USG. (Other firewalls will also work, but I provide no examples)
High-level overview
Here's what I'll explain:
- Configure Cloudflare certificates (strict security between Cloudflare and your Home Assistant server)
- Use the Nginx add-on for Home Assistant to work with Cloudflare
- Add a firewall rule to the Dream Machine to only allow Cloudflare to access my Home Assistant instance
Cloudflare setup
Cloudflare is a CDN that puts itself between a visitor and your origin server (in this case Home Assistant). The connection between the visitor and Cloudflare will automatically be secured with HTTPS.
However, since Home Assistant runs on unencrypted HTTP, that traffic will be unencrypted. Allowing third-parties to potentially eavesdrop on the unencrypted part.

What we want is encrypted traffic between visitors and Cloudflare and between Cloudflare and Home Assistant. This way, nobody can eavesdrop on your traffic.

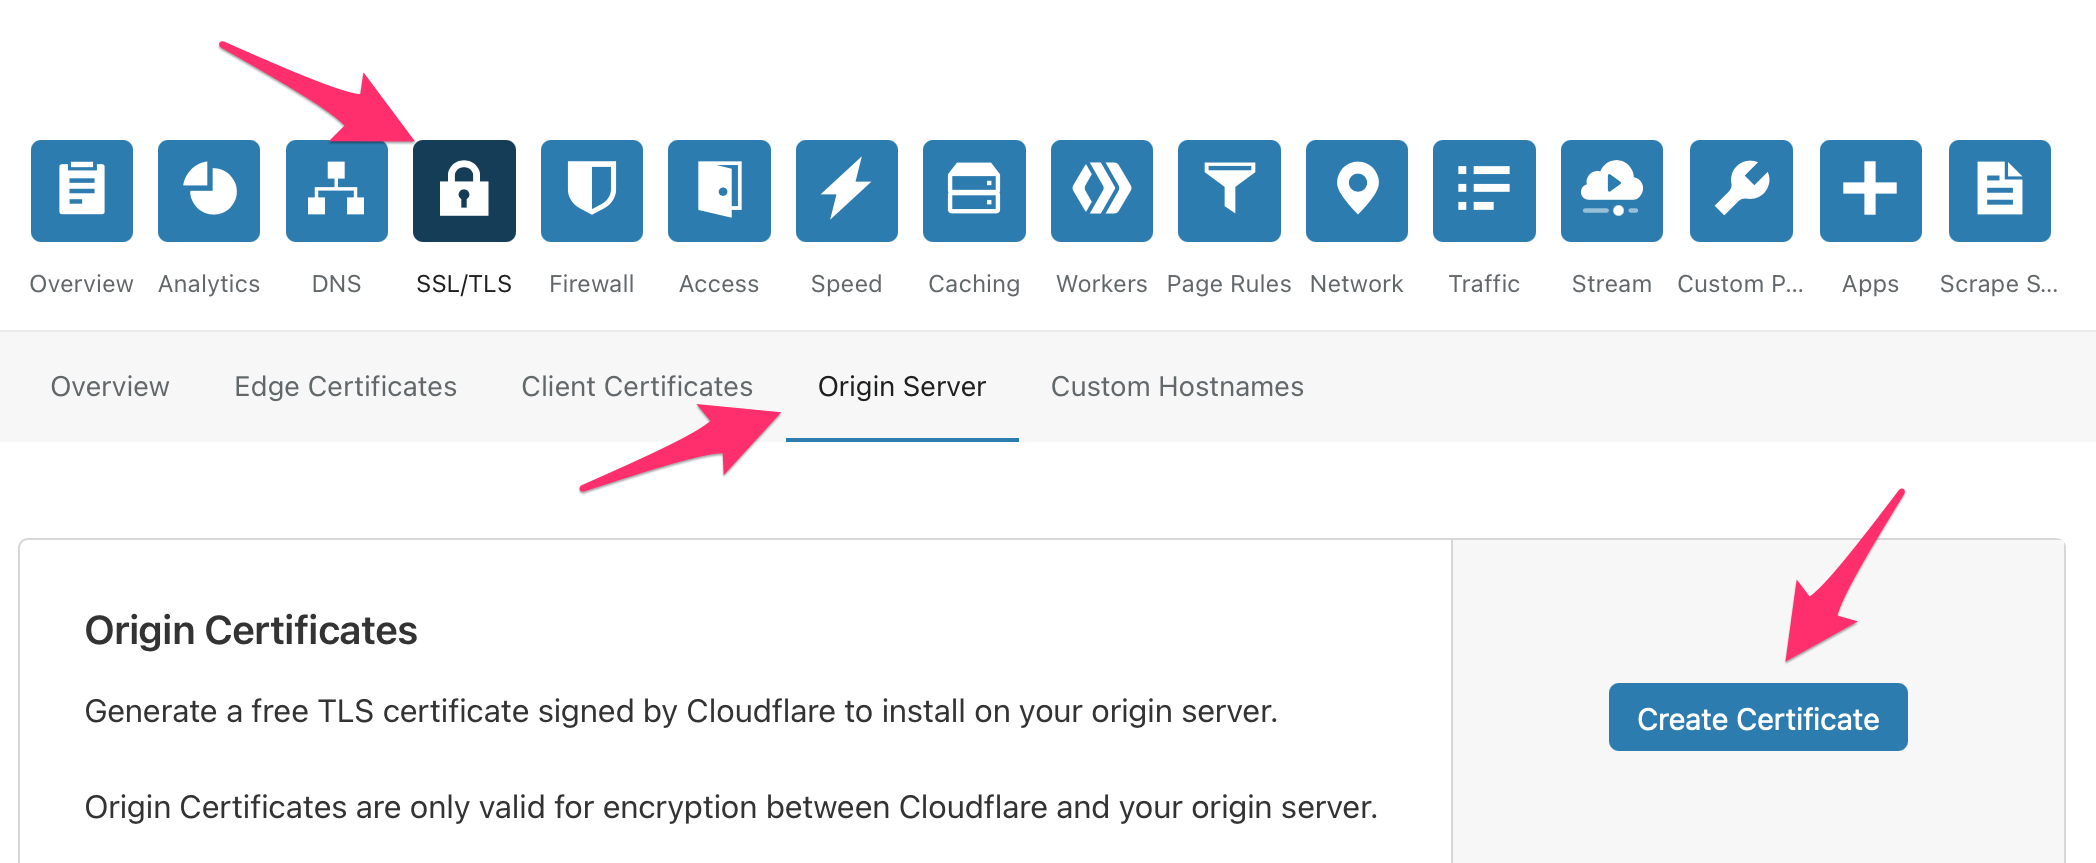
To set this up, we have to use the "Origin certificates" feature of Cloudflare:
-
Head over to Cloudflare, and click on your domain. Navigate to "SSL/TLS" > Origin Server > Create Certificate
-
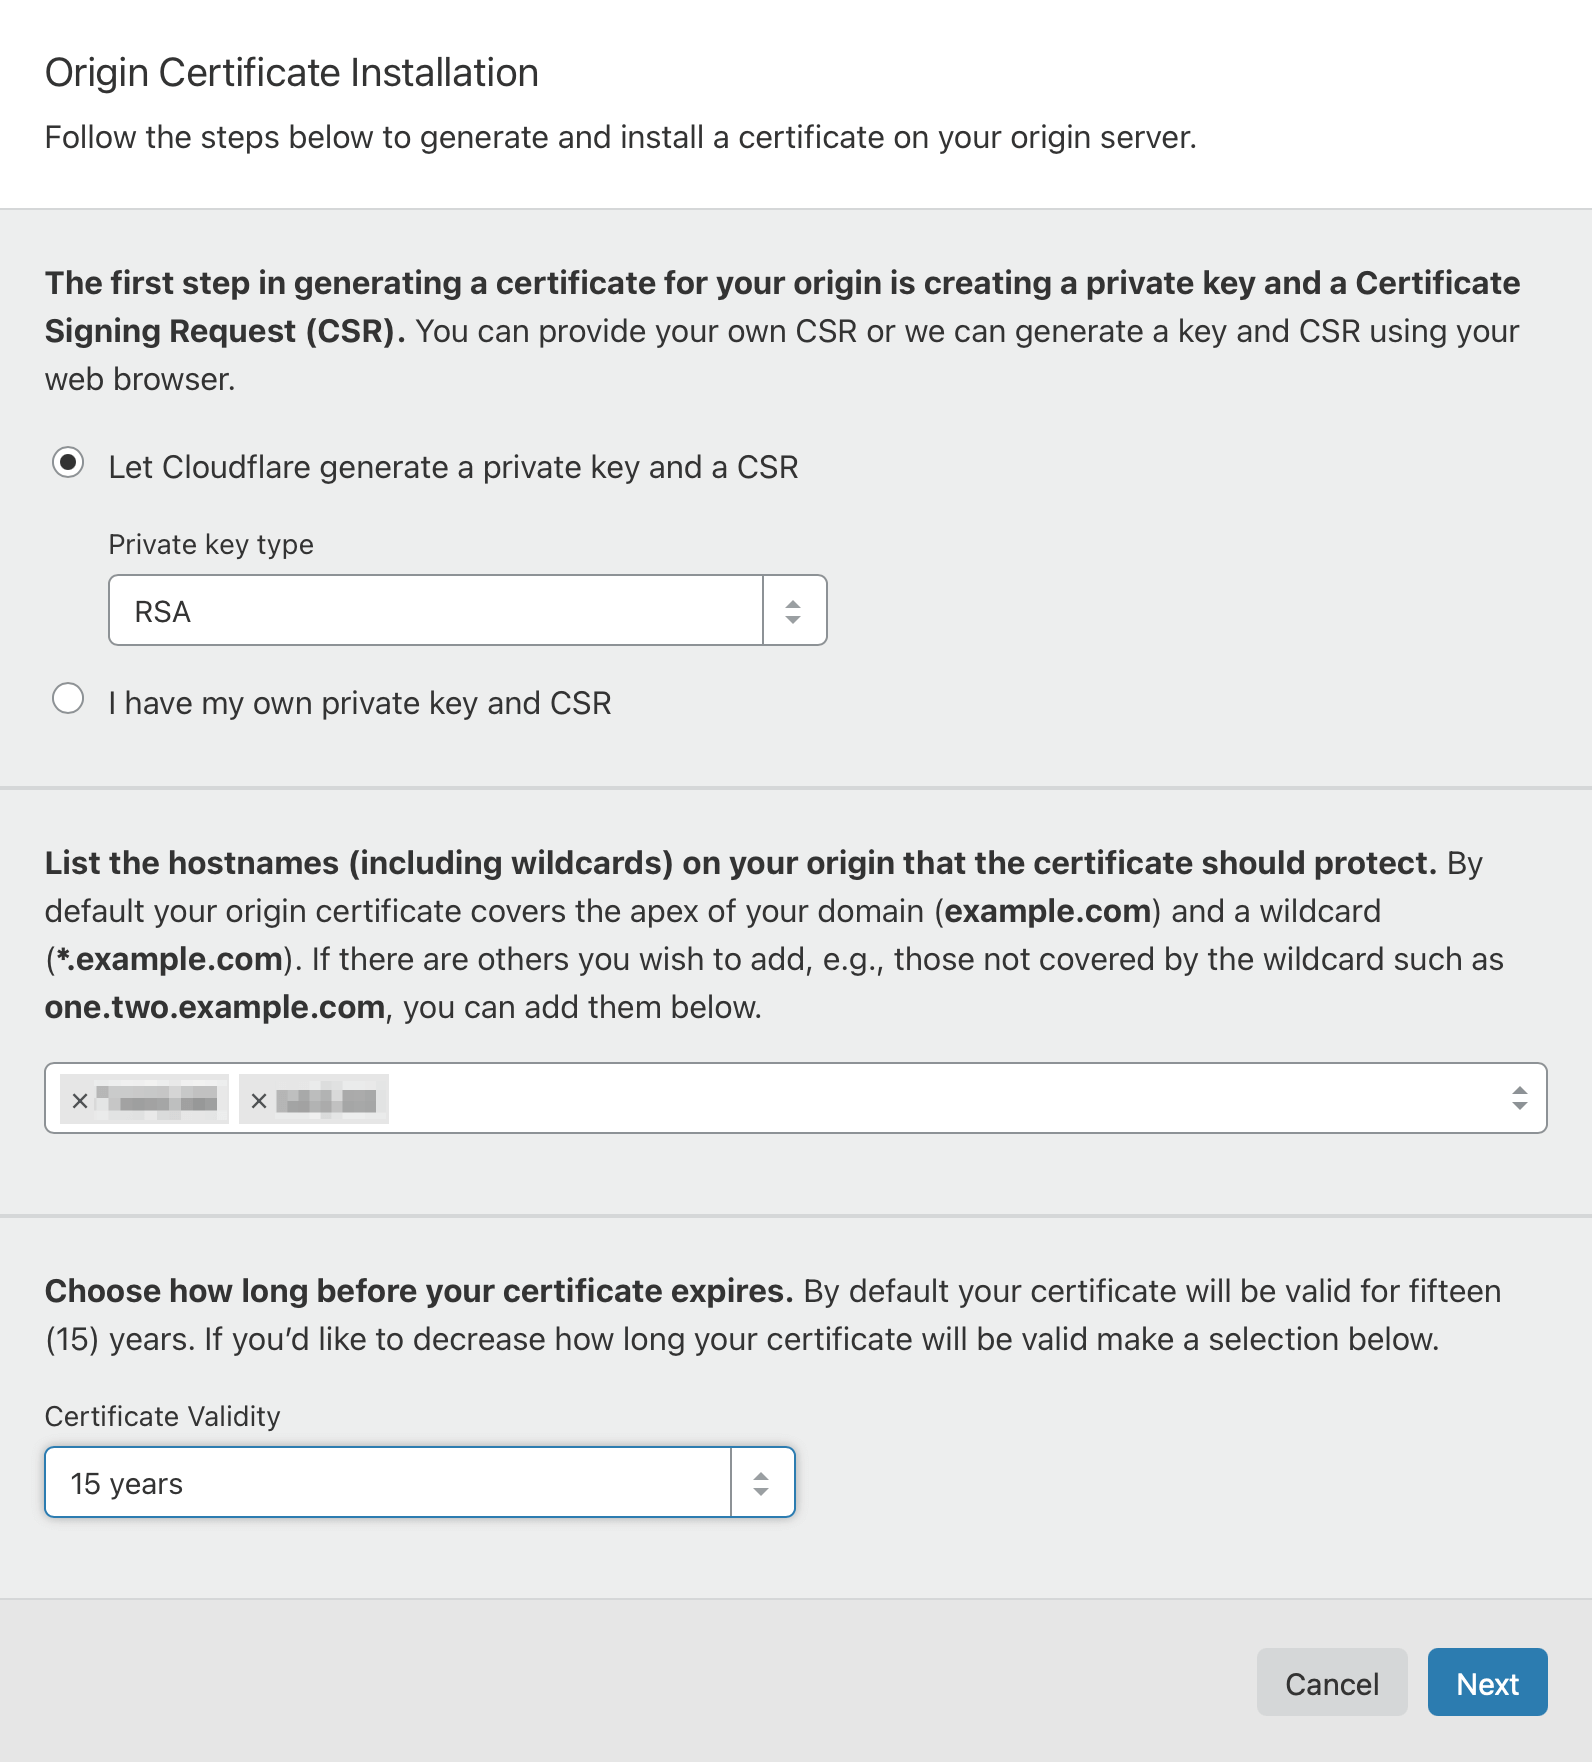
In the popup, let Cloudflare generate a private key for you. Your domain name will be pre-filled. I chose to make the certificate valid for 15 years for my own convenience. Remember: this certificate is only used to protect traffic between Cloudflare and your Home Assistant install. Traffic between you and Cloudflare will be secured with short-lived SSL certificates.
-
Go to the next step. Cloudflare will present you with an origin certificate and private key.
-
Save the "Origin Certificate" to a file called
cloudflare.pem -
Save the "Private key" to a file called
cloudflare.key


Now upload both these files to the /ssl folder on your Home Assistant server (via SSH or via Samba).

The last step is to enable strict encryption mode in Cloudflare.
- Head over to SSL/TLS > Overview
- Select "Full (strict)"
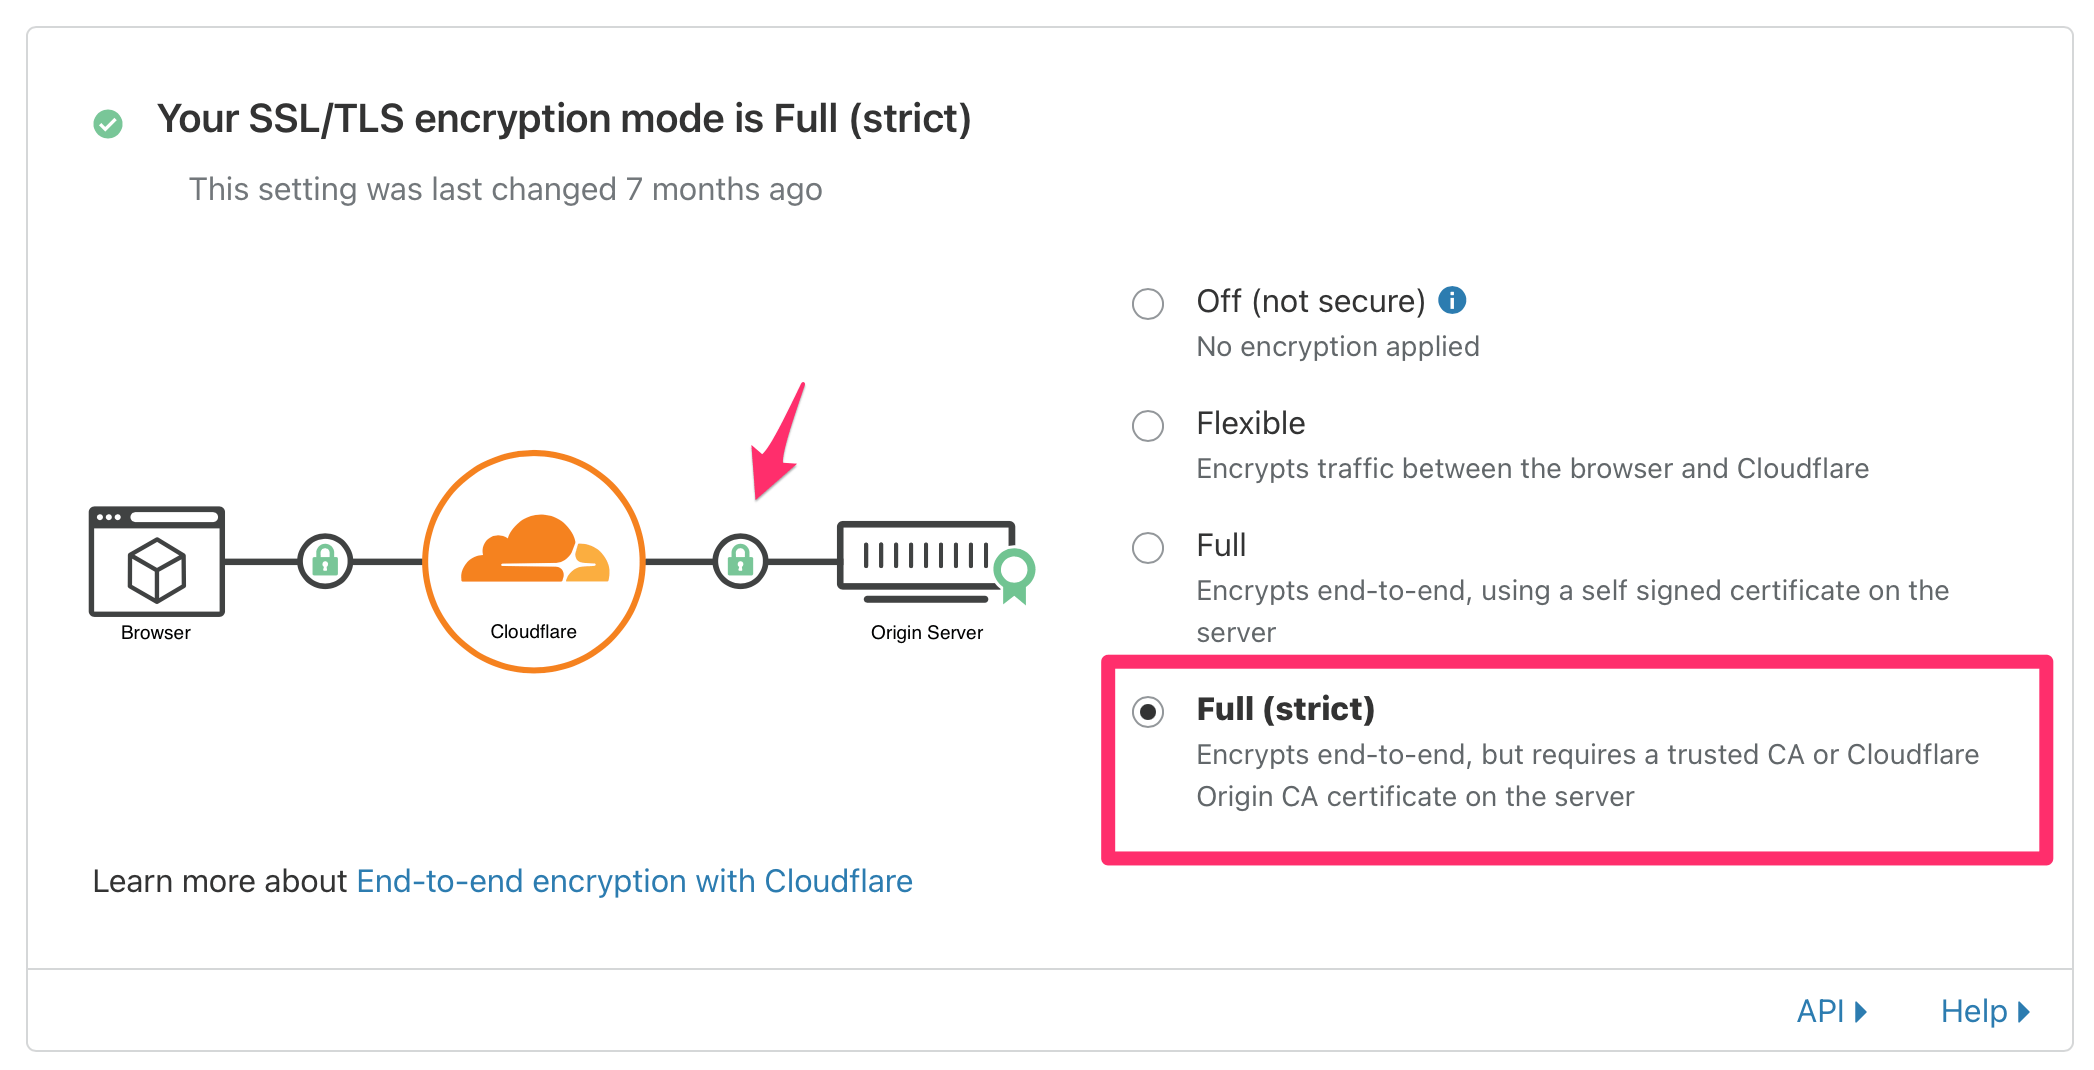

Cloudflare will now encrypt traffic between itself and your Home Assistant installation. It will also verify the identity of your server.
Note: this will temporarily break your Cloudflare setup because your Home Assistant server is not encrypting its traffic with the certificate we got from Cloudflare. We'll fix that in the next step!
Configuring Nginx on Home Assistant
Home Assistant has no built-in options to serve traffic over HTTPS. So we have to use Nginx as a reverse proxy that sits between Cloudflare and your unencrypted Home Assistant instance. It'll handle all the encryption.
-
Head over to your Home Assistant installation.
-
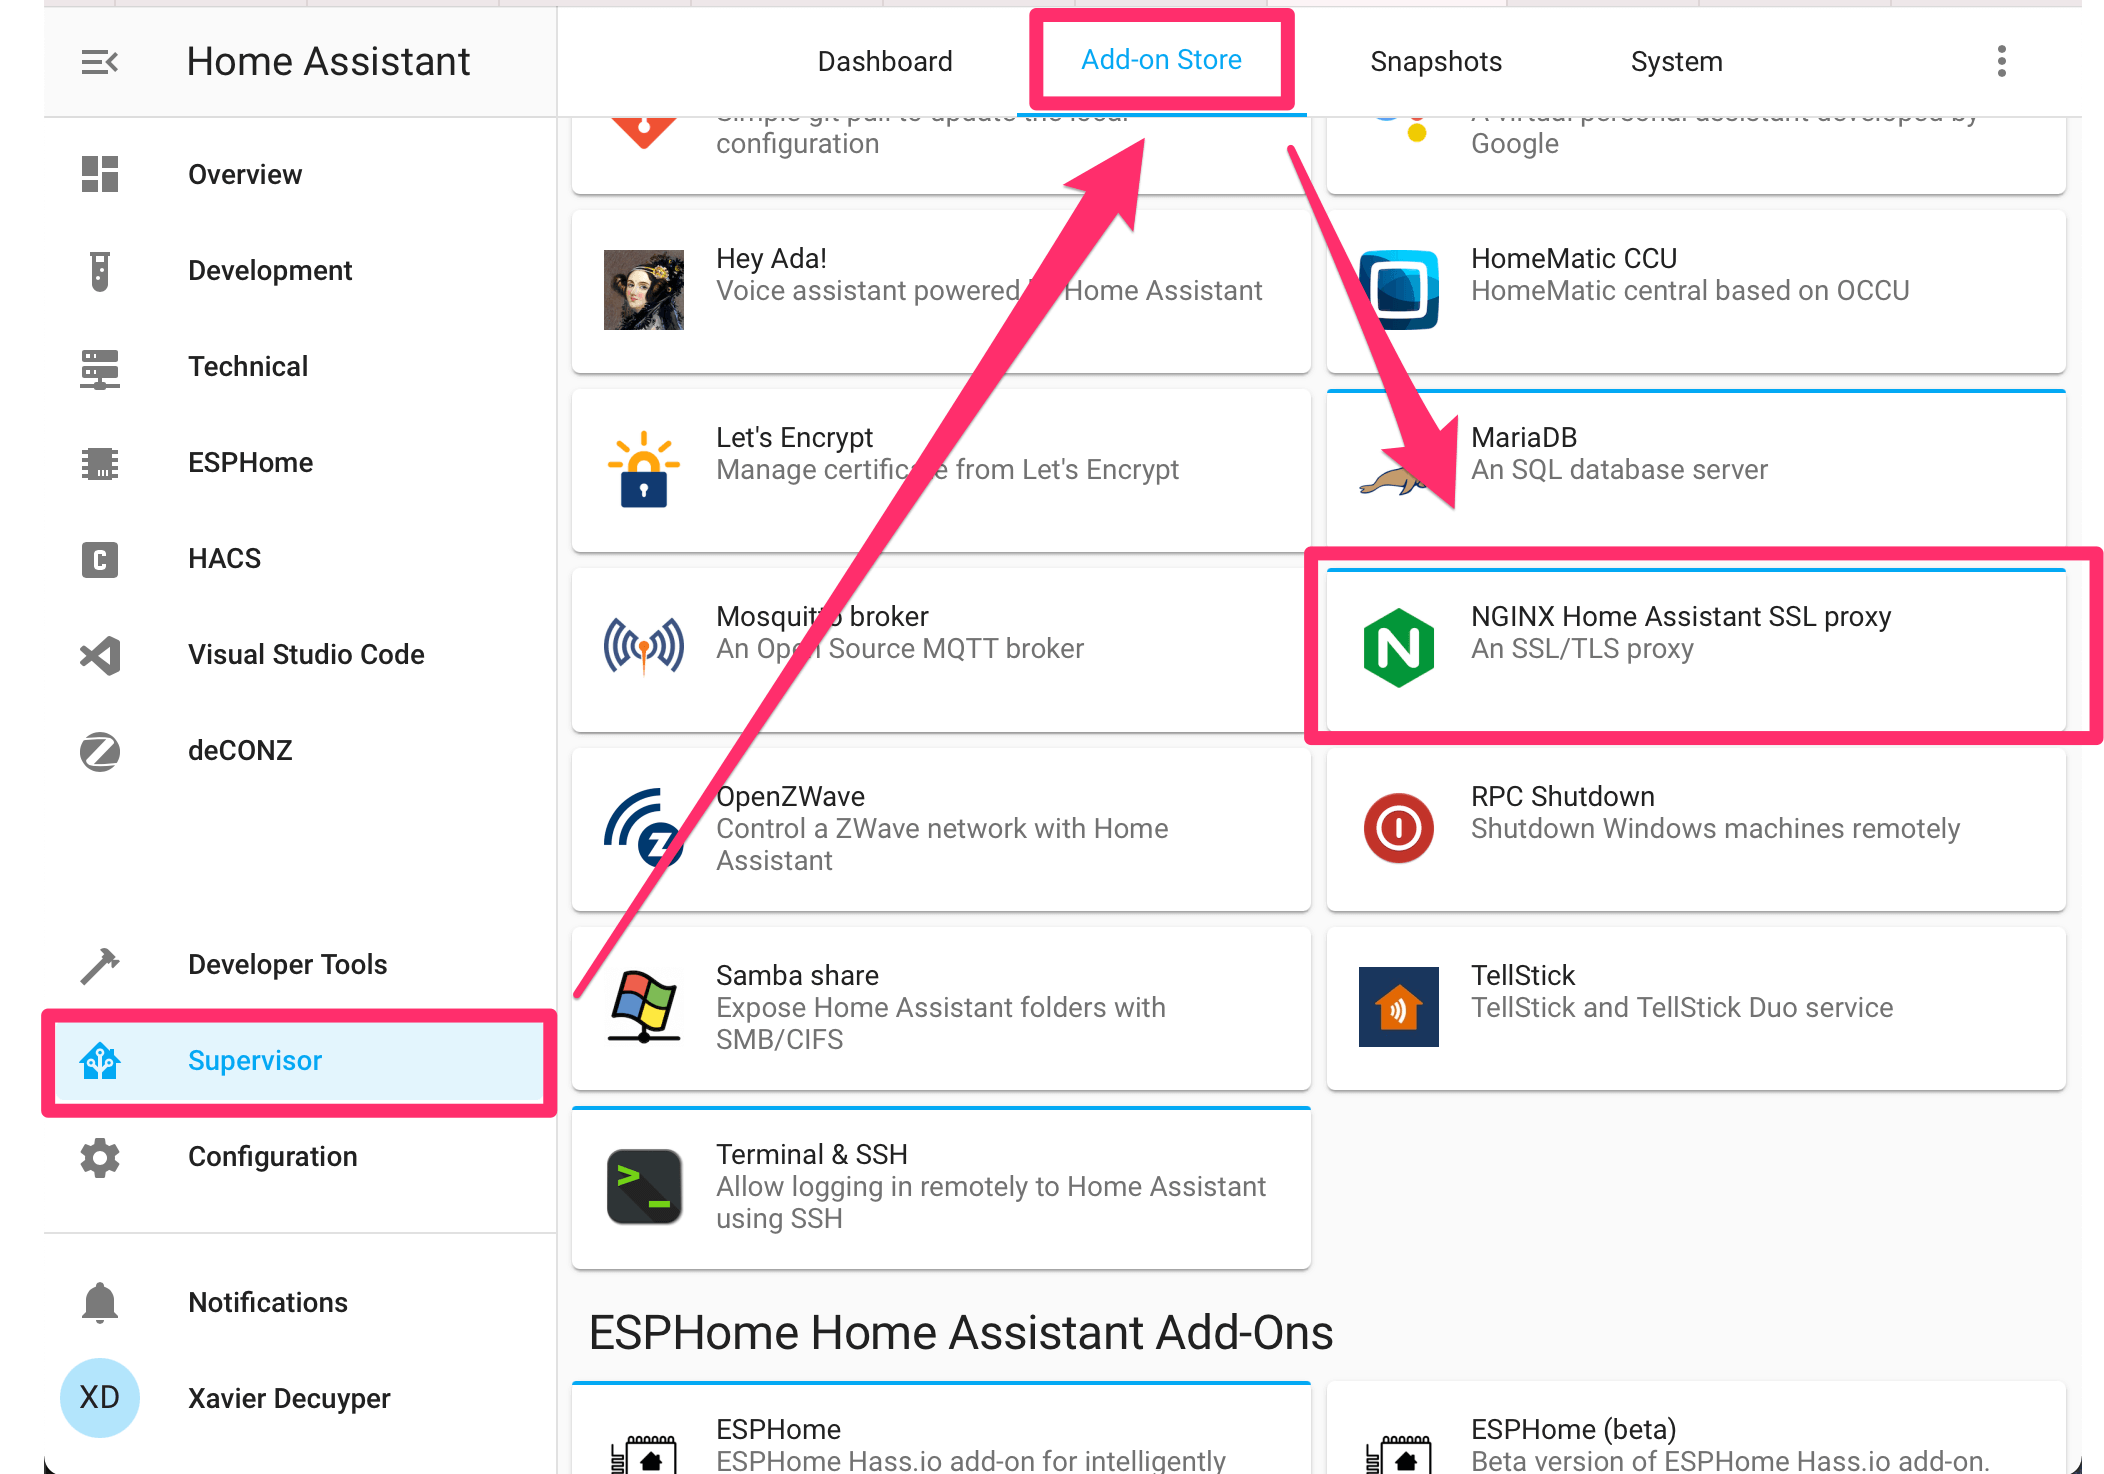
Go to "Supervisor" > "Add-on Store" and install the "NGINX Home Assistant SSL proxy" add-on.
-
Open the "Configuration" tab of the Nginx add-on and configure it as shown below:
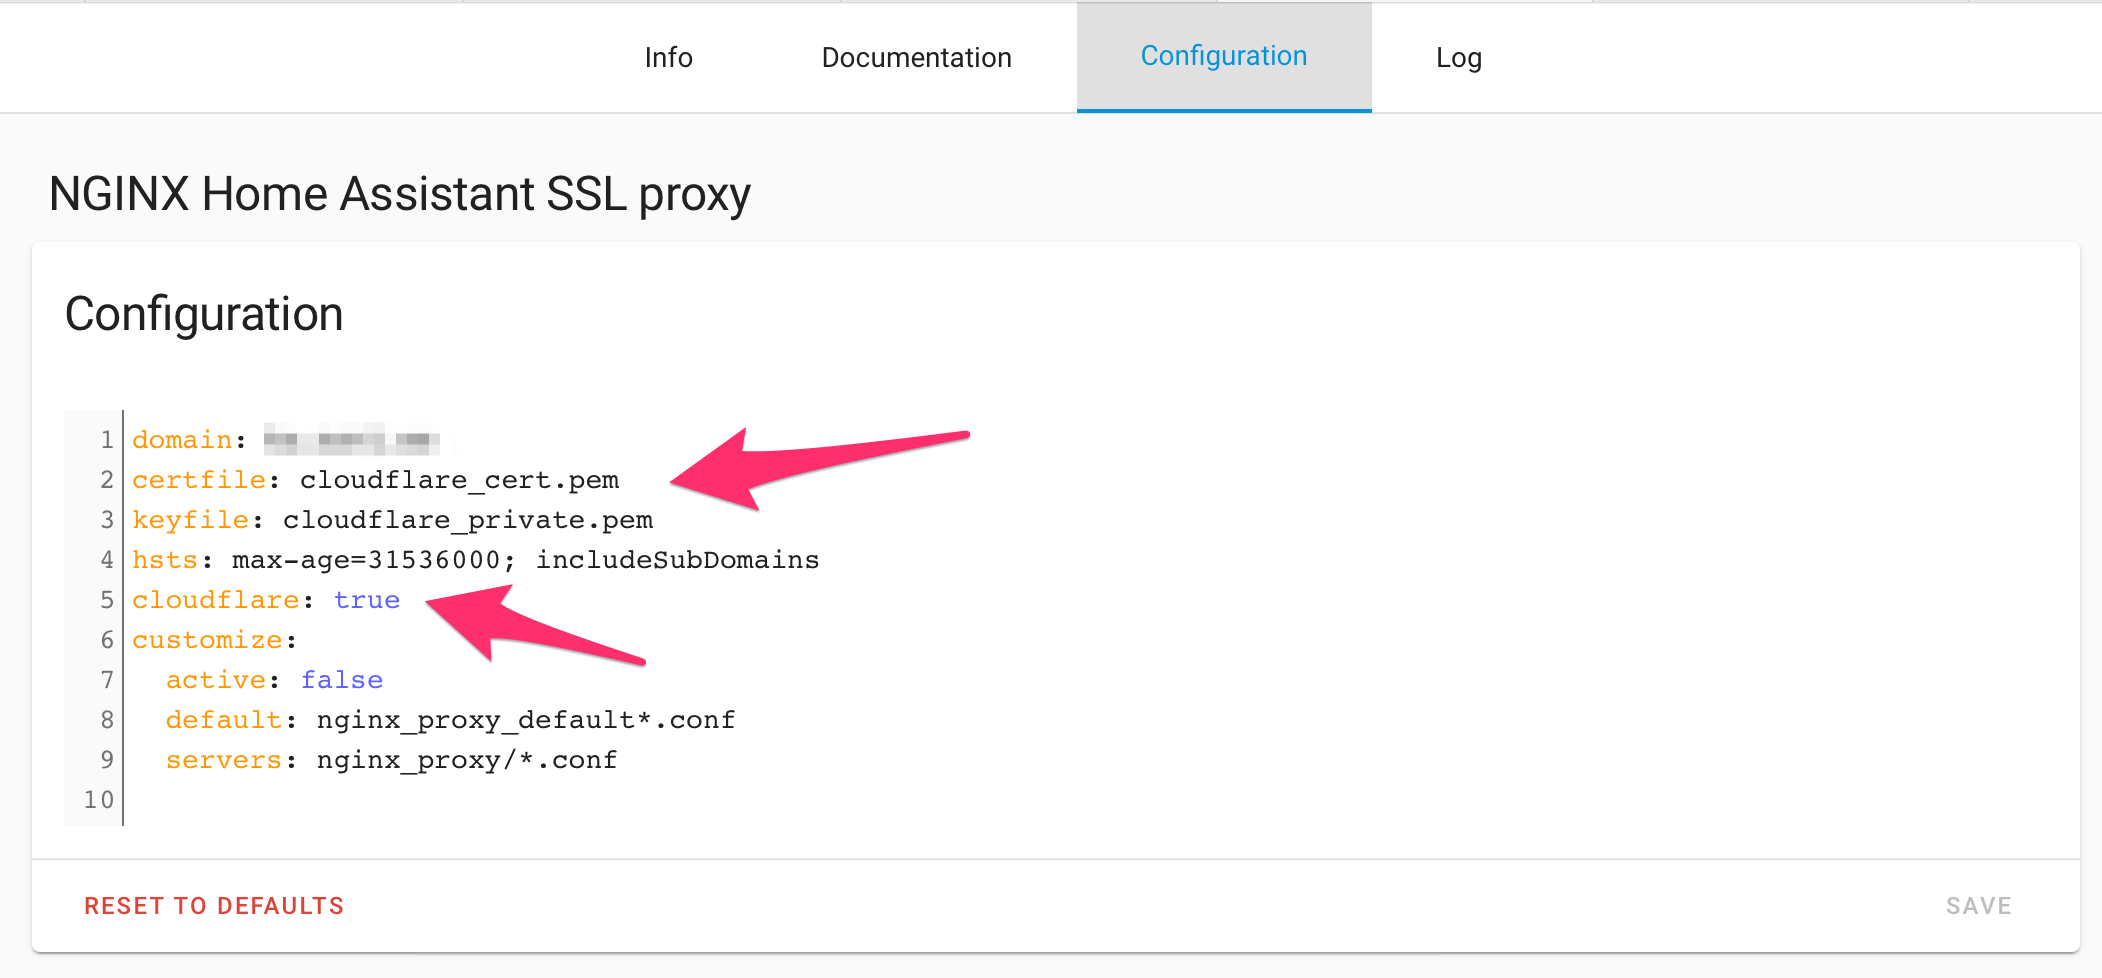


Make sure to set your domain and configure your SSL keys correctly.
As a bonus: set cloudflare to true, and Nginx will block all traffic not coming from Cloudflare. Cool!
domain: your-domain-name.com
certfile: cloudflare.pem
keyfile: cloudflare.key
cloudflare: true
Start (or restart) the Nginx add-on after you've made these changes.
Port-forwarding
You will need to open up some ports on your modem/router for this all to work. I won't provide detailed instructions on this since it's highly specific to your setup.
In my case, I run a Ubiquiti Dream Machine behind my ISP's modem. So I have to open up ports on both of these and make sure they match.

Internet -> Modem (port 2096) -> Dream Machine (port 2096) -> Home Assistant server (port 443)
Ubiquiti Dream Machine: firewall setup
Now you have successfully secured the connection between Home Assistant and Cloudflare. But nothing is preventing an attacker from directly connecting to your instance.
(Technically, Nginx will filter out that traffic, but we can add a secondary layer of protection. Just in case there's a security issue with Nginx.)
The port forwarding rule doesn't care about who is sending traffic. Time to set up a firewall rule!

First, we'll define 3 groups in Unifi:
- An IP group with Cloudflare's IP ranges
- An IP group with the IP address of your Home Assistant server
- An port group containing all the exposed ports of your Home Assistant box (only 1)
To create a group in your Unifi controller, head over to Settings > Security > Internet Threat Management > Firewall > Create New Group.

Let's start by creating a group containing all Cloudflare IP addresses. Luckily, they publish a list of used IP ranges. (Unfortunately, there's no way to keep this up-to-date automatically. So you might have to check back on this list in the future).

Next: a group containing the local IP address of your Home Assistant server.

And finally, a group containing all the ports that should be blocked for everyone, except Cloudflare. I'm only using port 2096, so that should suffice. However, to be on the safe side, I also blocked other web server ports.

Now you're ready to create the firewall rules.
The first rule will allow incoming traffic from Cloudflare (towards the Home Assistant server).
- Type: Internet In
- Rule applied: before
- Action: Accept
- Source
- Source Type: Address/Port Group
- IPv4 Address group: cloudflare_ipv4 (the group you made before, containing all Cloudflare IP ranges)
- Port Group: any
- Destination
- Destination Type: Address/Port Group
- IPv4 Address Group: home-assistant-server (the group containing the IP address of your Home Assistant server)
- Port Group: home-assistant-exposed-port (the group containing all exposed ports on your Home Assistant server)

The second rule will block all other traffic:
- Type: Internet In
- Rule applied: before
- Action: Drop (or deny)
- Source
- Source Type: Address/Port Group
- IPv4 Address group: any
- Port Group: any
- Destination
- Destination Type: Address/Port Group
- IPv4 Address Group: home-assistant-server (the group containing the IP address of your Home Assistant server)
- Port Group: home-assistant-exposed-port (the group containing all exposed ports on your Home Assistant server)

All done! Nobody outside Cloudflare can directly access your Home Assistant instance.

Testing
Time to test the firewall rules. At this point, you should be able to access your Home Assistant instance through your Cloudflare domain.
Next, I tried connecting to my remote IP address from my phone's 4G connection. No response. Good!
One final test: I logged into a remote server and tried to download my Home Assistant webpage with wget:
wget https://MY_IP_ADDRESS:2096 --no-check-certificate
The request just hangs and times out because the firewall dropped the packets.
--2020-12-12 13:26:18--  https://XX.XXX.XXX.XXX:2096/
Connecting to XX.XXX.XXX.XXX:2096... failed: Connection timed out.
Retrying.
Cloudflare firewall
Now that all your traffic runs through Cloudflare, you can use their firewall to block traffic as well. In my case: any traffic that comes from outside Belgium is unwanted.
So I'll block that:

This rule is currently blocking about 10-50 requests a day from other countries:

Ultra secure: Cloudflare Access + Cloudflare Argo Tunnel
Want more security?
You could add Cloudflare Access to add a secondary authentication layer on top of Home Assistant's login system.
And if you feel uncomfortable with opening ports on your network, you can use Cloudflare Argo Tunnel to set up a tunnel between you and Cloudflare. No ports to open! It does cost $5/month, but that might be worth it to you.
Bonus: using Cloudflare as Dynamic DNS provider
At this point, I'm pretty reliant on Cloudflare to secure my Home Assistant installation. But you can also use it as a dynamic DNS provider! Ideal for when you don't have a fixed IP address at home.
Instructions on how to set it up: https://www.home-assistant.io/integrations/cloudflare/
Final result
This is how I've organized external access to my Home Assistant installation:

Let me know if you have any feedback or experiences with securing your setup!

